
Processing PETG (Polyethylene Terephthalate Glycol) on a One-Step Injection Stretch Blow Molding (ISBM) machine is fundamentally different from processing standard PET. While standard PET is highly forgiving and relies on rapid crystallization dynamics, PETG is a completely amorphous polymer. This gives it the superpower of achieving massive wall thicknesses with glass-like clarity—but it also makes the material highly sensitive to shear stress, thermal degradation, and over-stretching. If you attempt to run PETG using standard PET machine parameters, you will instantly encounter gate blush (haze), yellowing, severe uneven wall thickness, and catastrophically brittle bottles. Mastering PETG requires a delicate balancing act across the injection barrel temperatures, multi-stage injection speeds, precise stretch rod timing, and aggressive mold cooling. This definitive engineering guide unpacks the exact parameter methodologies required to produce flawless, premium cosmetic and pharmaceutical PETG packaging.
1. The Thermodynamics of PETG: Why It Defies PET Logic
Before touching the PLC screen, operators must understand the material. PETG is formulated by adding cyclohexane dimethanol (CHDM) to the polymer backbone. This simple chemical modification destroys the polymer’s ability to form crystalline structures. Standard PET becomes white and opaque (crystallizes) if it cools too slowly or is reheated incorrectly. PETG, however, remains completely clear regardless of wall thickness.
However, this amorphous nature introduces three severe processing challenges:
- ✓Lower Melt Temperature: PETG degrades rapidly at temperatures that are considered normal for PET. While PET loves 275°C – 290°C, PETG will turn yellow and brittle above 265°C.
- ✓Shear Sensitivity: High injection speeds create friction (shear heating) as the melt passes through the narrow hot runner gate. For PETG, this shear instantly manifests as “gate blush”—a highly visible white haze at the bottom of the bottle.
- ✓Lack of Strain Hardening: During the blowing phase, standard PET naturally resists over-stretching, allowing it to distribute evenly across the mold. PETG does not possess this “auto-leveling” behavior. If the stretch rod or blow air is too fast, the material will blow out in one spot, creating dangerously thin corners.
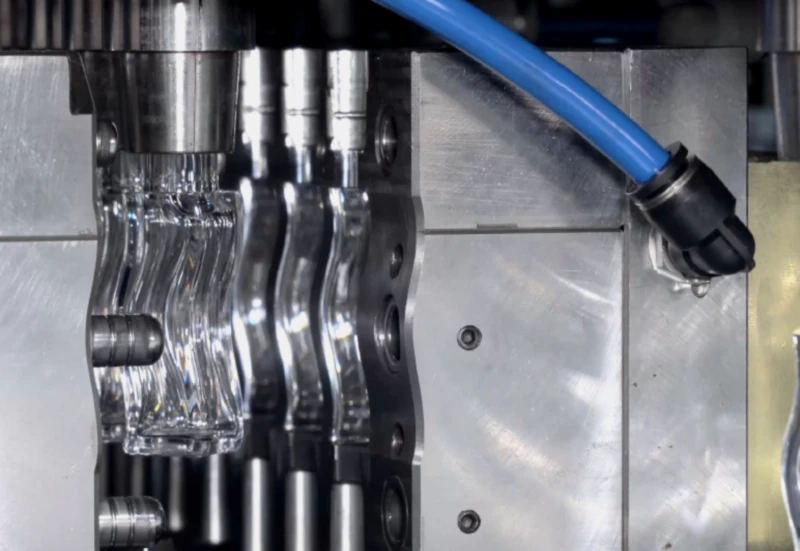 Fig. 1 — The ISBM Injection Station. Precision control over the PID temperature zones across the barrel and hot runner is the first critical step in processing heat-sensitive PETG without degrading optical clarity.
2. Injection Station: Setting the Barrel and Hot Runner Profile
The goal is to melt the PETG gently, achieving a homogenous melt pool without inducing thermal degradation. The temperature profile should typically be “ascending” from the feed throat to the nozzle, but significantly lower than standard PET.
| Heating Zone | Standard PET Target | PETG Target Profile | Purpose / Risk of Error |
|---|---|---|---|
| Feed Zone (Zone 1) | 265°C | 225°C – 235°C | Initiates melting. Too high causes premature bridging in the throat. |
| Compression (Zone 2/3) | 275°C | 240°C – 250°C | Core plastification. Ensure back-pressure is kept low (5-10 bar). |
| Metering/Nozzle | 280°C – 285°C | 255°C – 260°C | Final melt homogeny. >265°C will cause yellowing (degradation). |
| Hot Runner Manifold | 285°C | 260°C – 265°C | Keep as low as possible without causing short-shots. |
Engineering Rule of Thumb: Always start with the lowest possible temperature profile that allows the mold to fill completely. If you encounter short shots, do not immediately raise the barrel temperature; first, try increasing the injection pressure and adjusting the multi-stage speed profile.
3. Multi-Stage Injection Speed and Holding Pressure Avoidance
Because PETG is highly shear-sensitive, pushing the melt through a 1.2mm hot runner gate at maximum velocity will generate localized friction, burning the material and causing white haze at the base of the preform. A multi-stage injection profile is absolutely mandatory.
Set the initial injection speed low (15-25%) for the first 5-10% of the shot volume. This allows the polymer melt to pass the restrictive gate smoothly without fracturing the molecular chains or causing shear haze.
Once past the gate, ramp the speed up (60-80%) to quickly fill the bulk of the preform cavity. If you go too slow here, the preform skin will freeze against the cold mold core, causing flow marks and weld lines.
Holding Pressure Optimization
Holding pressure is used to pack more material into the mold as it cools and shrinks, preventing sink marks. However, excessive holding pressure in PETG creates severe internal residual stress. When this stressed preform is later blown, it will exhibit optical distortion (rainbow-like birefringence) or craze marks. Keep holding pressure to the bare minimum required to form a complete neck thread (usually 30-40% of peak injection pressure) and keep the holding time short (1.5 – 2.5 seconds).
4. Thermal Conditioning: The Secret Weapon of 4-Station ISBM
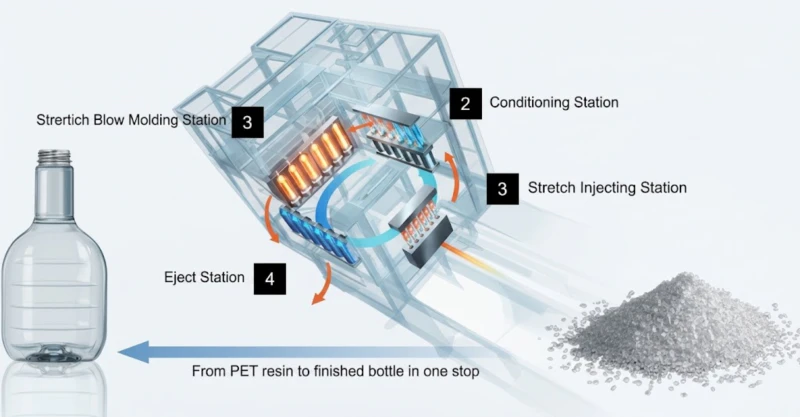
In a 4-station ISBM machine (Injection → Conditioning → Blow → Eject), Station 2 is the secret to thick-walled PETG perfection. Because PETG requires thick preforms (often 4mm to 6mm thick to produce heavy-bottomed cosmetic jars), the preform holds an immense amount of residual heat after injection.
If you transfer this preform directly to the blow station (as in a 3-station machine), the inner core of the preform will be far too hot and fluid, while the outer skin will be cool. When blown, the material will tear or stretch unevenly. The conditioning station uses a heated/cooled core pin and an external conditioning pot to equalize the temperature across the cross-section of the wall. For PETG, the conditioning station is almost always used as a cooling mechanism, actively extracting heat to bring the preform down to the ideal orientation temperature (approx. 105°C – 115°C) before blowing.
5. Stretch Rod Speed and Pre-Blow Timing Logic
The stretch rod mechanically drives the preform to the bottom of the blow mold cavity before the high-pressure air inflates it radially. Because PETG lacks strain hardening, it is highly sensitive to the speed of the stretch rod.
- ✓Stretch Rod Speed: If using a servo-driven stretch rod, set the velocity profile 10-20% slower than you would for standard PET. A rod that descends too aggressively will punch through the soft, hot base of the PETG preform, or thin the base out so severely that the bottle fails drop tests.
- ✓Pre-Blow Delay (Таймер предвыдува): Pre-blow is a small puff of low-pressure air (5-10 bar) introduced while the stretch rod is moving. For PETG, the pre-blow delay must be perfectly synchronized. If pre-blow starts too early, the bottle shoulders will be excessively thin. If it starts too late, the material will pool at the bottom, creating a massive, ugly lump of plastic at the base.
6. High-Pressure Blow (40-Bar) and Exhaust Parameters
Once the stretch rod reaches the bottom of the mold, the high-pressure blow valve opens, flooding the cavity with 3.0 to 4.0 MPa (30-40 bar) of oil-free compressed air. This forces the soft PETG against the cold walls of the mold, locking in the final shape and capturing sharp cosmetic details (like embossed logos or sharp bottom radii).
Blow Time and Exhaust: The high-pressure blow time is essentially the cooling time. The pressure must be held long enough for the thick PETG base to transfer its heat into the chilled mold steel. If you exhaust the high-pressure air too early (to speed up the machine cycle time), the thick bottle base will still be soft. Upon ejection, it will shrink, warp, or bulge outward (known as a “rocker bottom”). For thick premium cosmetics, a high-pressure blow time of 3.0 to 5.0 seconds is often required.
7. Mold Cooling: Freezing the Amorphous State
Parameter screens do not control everything; your external auxiliary equipment is equally critical. To freeze the PETG quickly and maintain its glass-like optical clarity, aggressive chilled water must circulate through both the injection mold and the blow mold.
Supply water from your industrial chiller should be set between 10°C and 15°C. Crucially, the water must achieve turbulent flow inside the mold channels (a Reynolds number > 4,000) to effectively pull heat out of the tool steel. A slow trickle of 5°C water is less effective than a violent, high-pressure flow of 15°C water. If the mold runs too hot, the PETG will stick to the blow mold surfaces, causing ugly surface defects and ejection jams.
8. Troubleshooting Common PETG Defects via Parameters
When producing heavy-wall PETG containers, operators will invariably run into aesthetic defects. Use this troubleshooting matrix to isolate the parameter fault:
- Defect: White Haze at the Base (Gate Blush).
Solution: Reduce Stage 1 injection speed significantly. Increase nozzle and hot runner temperature by 3°C to 5°C to lower melt viscosity at the gate. - Defect: Overall Yellowing / Brittle Bottles.
Solution: The melt is degrading. Lower the barrel temperatures across all zones by 5°C. Check if the cycle time is too long, causing the resin to cook in the barrel. Reduce screw back-pressure. - Defect: Thin Shoulders / Thick Base.
Solution: The stretch rod is hitting the bottom too early relative to the air. Increase the pre-blow pressure slightly, or trigger the pre-blow timer earlier in the stretch rod stroke. - Defect: Base Bulging After Ejection (Rocker Bottom).
Solution: The plastic is too hot when exiting the machine. Increase the high-pressure blow time by 1.0 second. Check chiller flow rates to ensure the blow mold base insert is receiving adequate cooling water.
Struggling with PETG Processing or Wall Thickness?
PETG is an unforgiving material that requires immense processing expertise. Our senior process engineers can remotely audit your machine parameters or provide on-site training to eliminate haze, optimize cycle times, and perfect your premium packaging.