Why It Matters
Why Mold Maintenance Determines Bottle Quality — and Production Cost
In twenty years of operating and commissioning Injection Stretch Blow Molding (ISBM) lines, I have witnessed the same pattern repeat itself across dozens of production facilities: a brand-new mold produces flawless, crystal-clear bottles in week one. Eighteen months later, the same mold produces bottles with flash lines, surface haze, and inconsistent neck dimensions — not because the mold design was wrong, but because the maintenance protocol was incomplete or inconsistent.
For premium cosmetic and pharmaceutical packaging — the applications where ISBM machines genuinely earn their keep — mold condition directly translates to product quality. A worn parting line does not just look bad; it creates flash that can contaminate the packaged product. A blocked cooling channel does not just slow production; it changes the preform’s thermal profile, destroying the optical clarity that the ISBM process was specifically chosen to deliver.
The good news: the overwhelming majority of premature mold wear is entirely preventable with a systematic, scheduled maintenance programme. This article gives you that programme — the exact checklist I use on every ISBM installation, derived from field experience across PET, PETG, PC, Tritan, and PP applications.
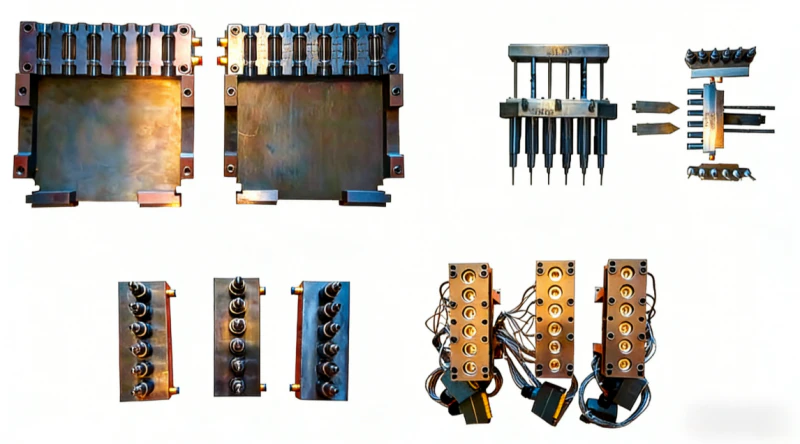
Fig. 1 — A precision ISBM mold for premium cosmetic packaging: every surface, channel, and sealing face has a direct impact on bottle quality and must be maintained to a defined schedule.
Root Cause Analysis
Understanding Mold Wear: The Six Root Causes
Before building a maintenance plan, you must understand how molds fail. In ISBM applications, I consistently see the same six mechanisms at the root of every premature mold failure. Your maintenance programme must address every one of them.
1. Thermal Fatigue
Repeated heat-cool cycles cause micro-cracking in the steel, especially around gate areas, corners, and thin sections. Most visible as fine surface crazing. Accelerated by insufficient cooling, excessive melt temperature, or inadequate warm-up cycles at production start.
2. Mechanical Wear on Parting Lines
Every mold open-close cycle exerts mechanical stress on the parting line faces. Foreign particles caught between mold halves — resin dust, environmental contaminants — act as abrasives, accelerating wear. Leads to flash and loss of dimensional precision.
3. Cooling Channel Scaling & Blockage
Mineral deposits from untreated cooling water progressively restrict flow through cooling channels. Even 0.5mm of scale reduces heat transfer efficiency by up to 30%, causing uneven bottle wall temperature during blowing and increased cycle time.
4. Chemical Corrosion
PVC, certain flame retardants, and degraded PET decompose to release hydrochloric acid, acetic acid, and other corrosive gases at processing temperatures. These attack exposed steel surfaces, particularly in venting slots and at the gate. Improper purging and extended material residence time are primary contributors.
5. Mechanical Damage from Misoperation
Forced mold closure on a mis-positioned preform, dropped tools during maintenance, incorrect ejection force settings — these impact events cause immediate visible damage to cavity surfaces, core rods, and neck ring faces. A single incident can write off a mold insert.
6. Residue Buildup & Venting Blockage
Volatile additives, mold release agents, and resin oligomers accumulate on cavity surfaces and in venting slots. Blocked vents cause burn marks, short shots, and surface defects on the blown bottle. Resin residue on cavity walls transfers directly to bottle surfaces as visible contamination.
“In every mold failure I have investigated, at least three of these six mechanisms were operating simultaneously. You cannot address one in isolation — your maintenance system must cover all six, at the correct frequency.”
— Senior ISBM Machine Operator, 20+ Years Field Experience
Checklist 1
Daily Maintenance Checklist (Every Shift)
Daily maintenance takes less than 15 minutes per shift. It is the single highest-ROI maintenance activity you can perform — catching small issues before they become expensive failures. These checks must be completed at every shift change, not once per day.
| ✓ | Task | What to Look For / Action |
|---|---|---|
| ☐ | Visual inspect cavity surfaces | Check for resin deposit, discolouration, visible scratches, or pitting. Any buildup on cavity walls will transfer to bottle surfaces as defects. |
| ☐ | Wipe parting line faces | Use a clean lint-free cloth with IPA (isopropanol). Remove all resin dust, oil films, and condensation. Any particle caught between mold halves accelerates parting line wear. |
| ☐ | Check venting slots | Clear any resin or oligomer buildup with a soft brass brush. Blocked vents cause burn marks on bottle surfaces and increase internal blow pressure on the cavity walls. |
| ☐ | Inspect neck ring & thread inserts | Look for resin flash in thread profiles, wear on the sealing face, and signs of corrosion. Thread insert condition directly affects neck dimensional accuracy and cap fitment. |
| ☐ | Check cooling water inlet/outlet temperature differential | Record inlet and outlet temperatures. A differential greater than ±3°C from baseline indicates reduced flow — possible early-stage blockage in cooling channels. Log and flag for weekly investigation. |
| ☐ | Verify mold clamping force | Confirm clamping pressure is within the machine specification for the mold in use. Under-clamping allows flash; over-clamping accelerates parting line face wear and can crack inserts. |
| ☐ | Inspect ejector & robot arm interface | Confirm the robot ejection arm grips and releases bottles cleanly without contact with cavity walls. Any misalignment during ejection can cause cavity surface scratching from repeated low-impact collisions. |
| ☐ | Record first-off bottle quality | Inspect the first bottle produced after shift start-up under diffuse and raking light. Look for haze, parting line flash, surface marks, and dimensional anomalies. Compare to the reference sample. Log any deviation. |
☐ = Check box for physical maintenance log. Adapt this table into your production tracking system.
Pro tip — Warm-up protocol: Never run production on a cold mold. After any maintenance stop or overnight shutdown, run the machine dry (without resin) for 3–5 cycles to bring the mold to operating temperature gradually. Sudden thermal shock to a cold mold is one of the leading causes of premature micro-cracking in cavity inserts.
Checklist 2
Weekly Maintenance Checklist
Weekly maintenance requires a planned production stop of approximately 1–2 hours. Schedule it at the end of the week’s last shift. These tasks address wear mechanisms that develop over hundreds of thousands of cycles and are invisible to daily visual inspection.
Remove cavity inserts from the mold base. Clean in an ultrasonic cleaner with an appropriate detergent solution, or use a purpose-formulated mold cleaner aerosol with a soft nylon brush. Never use steel brushes or abrasive pads on polished cavity surfaces — they will destroy the mirror finish that delivers optical-grade bottle surfaces. Rinse with deionised water and dry immediately with compressed air.
Apply the manufacturer-specified lubricant to all guide pillars, leader pin bushings, and side-action slide mechanisms. Under-lubrication causes metal-to-metal wear and binding; over-lubrication leads to contamination of cavity surfaces. Follow the lubricant quantity specifications in your mold manual exactly.
Vibration during high-speed ISBM operation progressively loosens mounting bolts. A loose mold can shift position by fractions of a millimetre — sufficient to create parting line mismatch, asymmetric bottle walls, and accelerated parting face wear. Use a calibrated torque wrench to specification; do not rely on feel.
Inspect nozzle tips for resin degradation (carbonised black deposits), tip misalignment, and heater element condition. A partially blocked or misaligned nozzle creates uneven resin distribution in the preform — the single most common cause of asymmetric wall thickness in the blown bottle.
Use calibrated go/no-go gauges to verify neck thread dimensions are within tolerance. Neck ring inserts are the highest-wear component in most ISBM molds due to the mechanical forces during preform clamping. Early detection of dimensional drift allows planned insert replacement rather than emergency breakdown replacement.
Test the cooling water pH (target 7.0–8.5), total hardness (target <150 ppm as CaCO₃), and conductivity. Record results. Water outside these parameters is actively depositing scale inside cooling channels. Adjust treatment dosing or arrange a water softener service if out of range.
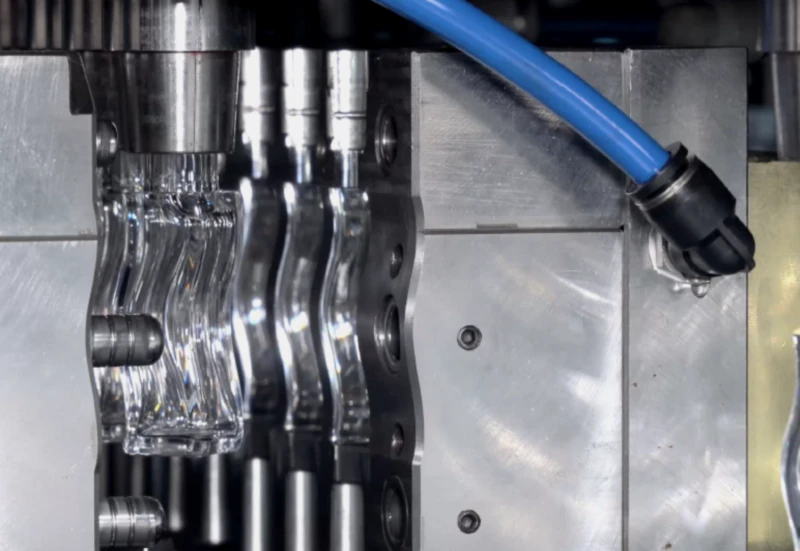
Fig. 2 — Weekly cavity cleaning using correct non-abrasive tools: the most critical intervention for preserving the optical-grade mirror finish of premium cosmetic bottle molds.
Checklist 3
Monthly Deep-Clean & Inspection Protocol
Monthly maintenance requires pulling the mold entirely from the machine for a full 4–8 hour service. This is your opportunity to catch developing problems before they become failures, and to perform work that cannot be done on-machine. Plan this as a scheduled production gap, not a reactive breakdown response.
Critical documentation rule: Every monthly service must generate a written report recording: (1) cycle count since last service, (2) profilometry readings on all cavity surfaces, (3) parting line gap measurements, (4) component replacements made, (5) any anomalies observed, (6) next service schedule confirmation. Without this data, you are managing a six-figure asset blindly.
Mold steel consideration for PETG & PC: If you are running PETG, PC, or Tritan on your ISBM machine, ensure the cavity steel is H13 or equivalent hot-work tool steel with a minimum hardness of 48–52 HRC and a corrosion-resistant surface treatment (nitriding or PVD coating). These materials are significantly more demanding than standard PET on mold steel. ISBM molds designed specifically for premium materials — such as those compatible with the Nissei ASB tooling standard — incorporate these specifications by design.
Critical System
Cooling Channel Maintenance: The Most Neglected Critical System
In my experience, cooling channel maintenance is the most systematically neglected aspect of ISBM mold care — and the one with the highest impact on bottle optical quality. Here is why this matters disproportionately for premium applications.
In One-Step ISBM, the temperature conditioning station sets the preform’s thermal profile for the blow stage. If the mold’s own cooling channels are partially blocked, the mold temperature rises unevenly — and this thermal non-uniformity propagates directly into the blown bottle as wall thickness variation and optical haze. The very quality advantages that justify choosing ISBM over two-step are silently eroded by a blocked cooling channel.
| Scale Buildup Level | Heat Transfer Loss | Impact on Bottle Quality |
|---|---|---|
| 0.1 mm scale film | ~10% reduction | Slightly increased mold surface temperature. Minor wall thickness drift beginning. Detectable only by measurement. |
| 0.3 mm scale film | ~25% reduction | Noticeable cycle time increase. Wall thickness variation ±0.1–0.15 mm. Beginning of optical haze in thin bottle wall sections. |
| 0.5 mm scale film | ~30–40% reduction | Significant quality failure. Wall thickness out of tolerance. Visible haze. Bottle deformation under hot fill. Rejection rates spike. Mold operating outside safe thermal range. |
| Full blockage | Total — no cooling | Production impossible. Risk of thermal damage to mold steel and cavity surfaces. Immediate shutdown required. |
Cooling Channel Descaling Procedure (Quarterly)
Disconnect the cooling circuit from the chiller. Flush with clean warm water at maximum available flow rate to remove loose debris. Measure and record flow rate (litres/min) as baseline for comparison after descaling.
Circulate a pH-appropriate descaling solution (dilute citric acid at 5–10% for calcium scale; specialist rust remover for iron deposits) through the cooling circuit using a dedicated descaling pump. Circulate for 2–4 hours at 40–50°C solution temperature. Monitor pH rise — when pH stops increasing, the descaling reaction is complete.
Drain the descaling solution completely. Neutralise residue by circulating a dilute sodium bicarbonate solution (1%) for 30 minutes. Flush with clean deionised water until the outlet pH matches the inlet pH. Any residual acid in the cooling circuit will corrode the mold steel from the inside.
Measure post-descaling flow rate and compare against the pre-descaling baseline. A restored flow rate confirms successful descaling. If flow rate has not recovered to within 15% of original, partial blockage remains — consider mechanical rodding or channel replacement. Add corrosion inhibitor to the cooling water before reconnecting to the chiller.
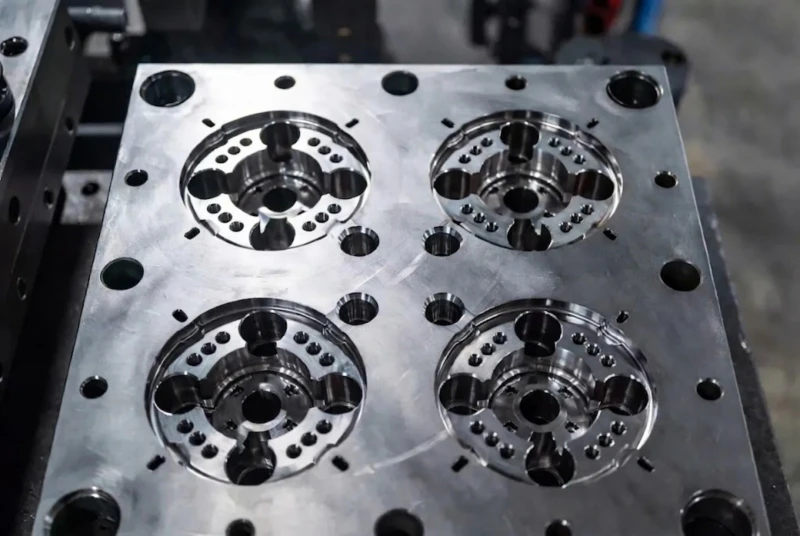
Fig. 3 — Cooling channel condition directly controls bottle wall temperature during blow molding. Even 0.5mm of scale reduces heat transfer by 30–40%, creating the optical haze and dimensional drift that disqualifies bottles from premium cosmetic applications.
Storage & Changeover
Mold Storage & Changeover Best Practices
A mold is at risk of damage not only during production but during every changeover and storage period. Improper storage is responsible for a significant proportion of the corrosion, surface damage, and O-ring failures I encounter on site visits. These protocols eliminate that risk.
Correct Mold Removal Procedure
Step 1 — Purge and cool down: Before removing the mold, purge all resin from the hot runner system with a compatible purging compound. Reduce machine temperature to below 80°C. Never remove a mold while hot runner zones are still at processing temperature — thermal expansion differences will make re-alignment difficult and may damage heater connections.
Step 2 — Drain and dry cooling circuits: Fully drain all cooling water from the mold circuits using compressed air. Any residual water left in channels during storage will cause corrosion of the channel walls and O-ring surfaces. Use a moisture indicator paper at the outlet to confirm channels are dry before storage.
Step 3 — Apply cavity protection spray: Apply a thin, even coat of acid-free anti-rust protection spray to all cavity surfaces, parting line faces, and exposed metal surfaces. Use a product specifically formulated for precision molds — not general-purpose WD-40 or petroleum grease, which leave residues difficult to fully remove before next production run.
Step 4 — Cap all ports and openings: Install plastic plugs or taped covers on every cooling water port, hot runner connector, and venting slot. Prevents dust, insects, and ambient moisture from entering internal passages during storage. Seal the entire mold in a VCI (Volatile Corrosion Inhibitor) bag for storage periods exceeding two weeks.
Storage Environment Requirements
Temperature
Store between 15–25°C. Temperature extremes cause differential expansion in multi-component mold assemblies, misaligning precision-fitted components. Never store a mold in an unheated outdoor location.
Humidity
Maintain relative humidity below 60%. High humidity causes surface corrosion on unprotected steel within days, and causes the VCI protection chemistry in storage bags to become saturated and ineffective.
Support & Orientation
Store molds on dedicated wooden or rubber-padded racking, not on bare concrete floors. Molds must be stored parting line up, never on their cavity faces. Even short periods of storage resting on cavity surfaces causes surface damage from the mold’s own weight.
Labelling & Records
Attach a waterproof label to every stored mold showing: mold ID, bottle SKU, total cycle count, last service date, next service due, and condition status. Without this, returning to a stored mold after months of inactivity risks using a mold that has exceeded its service interval.
Fig. 4 — Correct mold storage: labelled, sealed in VCI bags, stored parting-line-up on padded racking in a humidity-controlled environment. Proper storage prevents more mold damage than most production-phase maintenance combined.
Master Summary
Master Maintenance Log & Final Summary
The table below is your master maintenance schedule. Print it, laminate it, and post it at every ISBM machine station. It consolidates every task in this article into a single reference that operators can work from without reading the full guide.
| Frequency | Task | Time Required | Priority |
|---|---|---|---|
| Every Shift | Visual inspection of cavity surfaces & parting lines | 3 min | Critical |
| Wipe parting line faces with IPA cloth | 2 min | Critical | |
| Clear venting slots with brass brush | 2 min | Critical | |
| Check & record cooling water ΔT | 2 min | Critical | |
| Verify clamping force setting | 1 min | Critical | |
| Inspect neck ring & thread inserts | 2 min | High | |
| First-off bottle quality check & log | 3 min | Critical | |
| Weekly | Full cavity ultrasonic or chemical clean | 60–90 min | Critical |
| Lubricate guides, bushings & slides | 20 min | Critical | |
| Re-torque all mold mounting bolts | 15 min | High | |
| Hot runner nozzle & heater check | 20 min | Critical | |
| Cooling water quality test (pH, hardness) | 10 min | High | |
| Monthly | Full mold disassembly & photographic inspection | 3–4 hr | Critical |
| Surface profilometry on cavity faces | 30 min | Critical | |
| Parting line gap measurement (feeler gauge) | 20 min | Critical | |
| O-ring & cooling seal replacement | 45 min | Critical | |
| Cavity mirror polishing (if Ra > 0.1 μm) | 1–2 hr | Conditional | |
| Neck ring dimensional check (go/no-go) | 15 min | High | |
| Quarterly | Full cooling channel descale (citric acid circulation) | 4–6 hr | Critical |
The Operator’s Golden Rules — Summary
- Never run production on a cold mold. Always complete the warm-up cycle. Thermal shock is the primary driver of cavity insert micro-cracking.
- Never use steel tools on polished cavity surfaces. One scratch with a steel screwdriver can permanently damage a mirror finish worth thousands of hours of polishing work.
- Monitor cooling water ΔT every shift. A rising differential is the earliest warning sign of scaling — catching it early saves a full descale operation and prevents quality failure.
- Replace O-rings monthly on schedule, not on failure. A failed O-ring in production causes more damage than the cost of monthly preventive replacement for the entire mold’s lifetime.
- Document everything. A mold without a service history is a liability. The cycle count, surface condition, and maintenance history directly determine the mold’s residual value and remaining service life.
- Use the correct mold for the correct material. An ISBM mold designed and heat-treated for PET will wear significantly faster when running PETG, PC, or Tritan. Always match mold steel specification to the resin — consult your machine and mold supplier if in doubt.
- Leverage your machine supplier’s expertise. ISBM machine manufacturers who have been building these machines for 20+ years — and who supply molds designed to work with their specific machine platforms — have maintenance knowledge that no generic guide can fully replicate. Use that resource.

Fig. 5 — The result of systematic mold maintenance: a well-maintained ISBM machine running a precision mold produces consistently flawless, crystal-clear premium packaging — cycle after cycle, shift after shift, for millions of shots.
Your ISBM mold is not a consumable. It is a precision engineering asset with a service life measured in millions of cycles — provided it receives the systematic care this guide describes. The operators and plant managers who treat mold maintenance as a core production discipline, not an afterthought, are the ones producing the premium-quality bottles that luxury cosmetic brands demand. The checklist is in your hands. The quality is in your operations.
Blow Molding Mold Maintenance Specialist · 20+ Years Field Experience
Specializing in ISBM machine operations, mold qualification, and preventive maintenance programme development for cosmetic, pharmaceutical, and food-grade packaging facilities. This article reflects field-tested experience across PET, PETG, PC, and Tritan applications on multiple machine platforms. Published in association with injectionstretchblowmolding.com — a leading One-Step ISBM machine supplier, compatible with Nissei ASB and Aoki mold standards, backed by a manufacturing partner with 20+ years of excellence (est. 2003).
Need Spare Parts, Mold Support, or a New ISBM Machine?
Our local support team maintains critical spare parts stock for immediate dispatch. Compatible with Nissei ASB and Aoki mold platforms. Factory-direct pricing — 20+ years of manufacturing excellence behind every machine.


